Week 1: 4th November 2024
Understanding Creative Media Companies
In this lesson, we had to understand the differences between the different types of companies involved in creative media production and how these companies contribute to the industry. We also learned the difference between horizontal and vertical integration and what they mean for the creative media industries.
There are three different types of companies: developers, publishers and exhibitors.
Designers/developers
Making a game (product) is an expensive job and many people have to work on it and it often costs a lot of money, it ranges sometimes in the millions, depending on the type of studio that works on it.
Typically developers are the ones who produce or create the game, including all the content and future updates usually with the financial help and backing of a publisher to help with the cost.
An example of a game company that are developer is Hello Games.
Publishers
They fund the development and marketing of the games. Making a game takes a lot of investment, financially and this is a reason why many developers seek the help of a publisher.
They usually handle the marketing cost and the pay for television or screen-based advertisement, print adverts, online/social media advertisements.
Examples of companies that are publishers are Sega, Ubisoft and Activision.
Distributors
They get the physical game released to the public, which are typically sold through a retailer. They are shops that sell you the physical copy of the game, the copy can be on a cartridge, magnetic storage, optical discs and flash memory cards.
Examples of companies that are distributors are Tesco, Steam and Epic Games.
There are two types of integration:
Vertical Integration is when a parent company operates that owns more than one of the stages of production in a single industry. Being vertically integrated helps increase sales, cancels extra costs and improves profit through better control over the business operation.
Horizontal Integration is when a single parent company own other companies or studios across different industries. This integration helps the company grow in size and revenue, it helps expand into new markets
Research Task:
Developing Contextual Awareness
We built our understanding of how 2D games have evolved over time.
Game genre is the classification that is assigned to a video game based on its core gameplay rather than a visual or narrative feature. Examples of game genre are: fighting, puzzle, platformer, action adventure, simulation and etc.
Verb is the action a player performs in the game by pressing a button and versatile verbs is the action that can have different outcomes depending on how it is performed, this can include combining verbs to create a new action.
Invisible tutorials are integrated game instructions that are in the gameplay mechanics. it creates an invisible game onboarding design, players might not even notice the "tutorial" as they will be so subtle hints of how to play game. This helps the player play without being babied the whole way through the game.
Game Maker's Toolkit. (2015). Half Life 2's Invisible Tutorial. Available: https://www.youtube.com/watch?v=MMggqenxuZc. Last accessed 11th Nov 2024
Week 2: 11th November 2024
Level Design Workshop
We developed our understanding of 2D platform games by demonstrating our understanding of contexts and design elements through practical implementation.
After watching this video I learnt that invisible tutorials can be integrated into to the game in many different ways. This could be through:
Pop-ups, narrating, pause menu, subtle design, puzzles and etc
In groups, we designed a game by applying knowledge of our understanding of invisible tutorials. We first created a plan on how we wanted our levels to look and how we wanted to add in our invisible tutorial.

.jpg)
After creating the plan of the game we assembled the game on Super Mario Maker.

Once we created the game we were given feedback on the game from our classmates:
They told us that we had good placements of the enemies and that it was an easy and simple way of telling the player to kill the enemies by jumping on them.
We were told to make changes, such as getting rid of some elements of the game so that it could be more beginner-friendly. eg remove the Canon balls
As this design was supposed to be for beginner players, one of the feedbacks we got was to make the route to the finishing more easier. eg remove the snake platform
The concept of risk vs reward should be thought about when creating a beginner-friendly platform game.
Week 3: 18th November 2024
Introduction to Construct 3
We learned how to use construct
There are many different windows in Construct 3:
- The layout is where you put everything together, the whole element of the game is created in this window.
- The event sheet is where you tell the engine what to do for the game to run.
- The project window is where you manage all the assets, and get a insight to what you are creating.
- The layers window is where you organise all the items on the layout.
- Properties
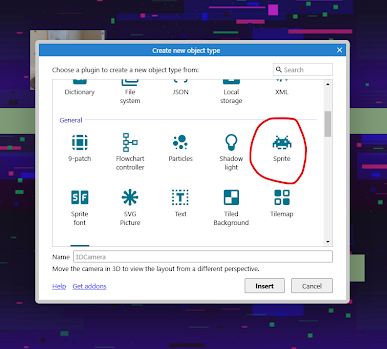
Object in construct 3 is the items you add to the layer for example this could be platforms and player/character.
Behaviours can be added to objects, they determine what the object will be like in the game. You can add behaviours such as being in solid to objects this is something I applied to my platforms.
To add a behaviour to the platform I first selected the item and then went into the properties window and clicked on the "behaviour" icon.
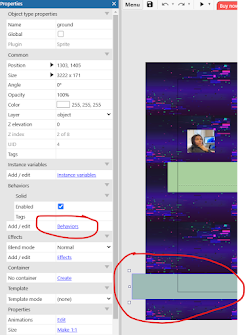
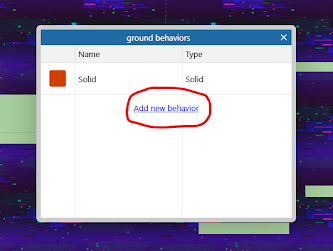
I then clicked on "add new behavior" to then selected the specific behaviour.
Event sheet is the section where you tell the engine what the game should do.

Then when you want to add the "coding" to the game go to the layout called "Event Sheet" to then go onto "Add Event" to make your game function the way you want it to.
In the image above I've used the event sheet to add the key function for the player to move around in the game.
As it was my first time using construct 3 I was able to learn the very basics of making a platform game. I was able to learn to add objects to the game and give specific behaviours to the objects. I felt as if it was much easier to do advanced "coding" once I learned the basic methods, such as the interlink. What I found hard in this lesson was following through the steps given by the teacher (Vinny) as everyone was at their own pace. This was soon fixed when we were given a video with audio instructions to follow through instead.
DDS: Planning for a Game Project
Construct 3: Part 2
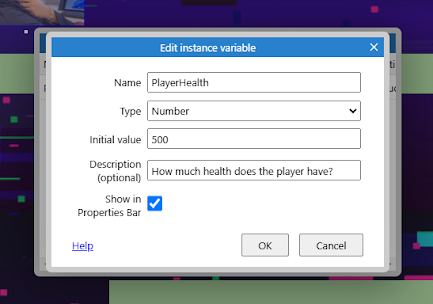
In this lesson I have added a health bar to the game and I did this by adding a instance variable to the player by first selecting the player.
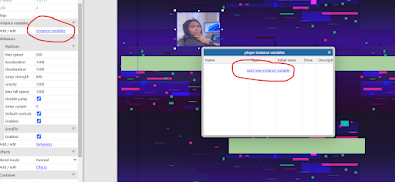
I added an own instance variable to the player by clicking on what is circled. Then adjusted the settings accordingly. I made sure the initial variable was rest to more then zero.
I went back onto the HUD layer to then to right click to add a new object on sprite.
In this lesson I was able to work on a different layer called "HUD", this layer is supposed to be stable throughout every level of the game.
What I found the most difficult was making sure that everything I was adding was being added to the HUD layer and not on layer 1. I had to learn to make everything I wanted on the HUD layer appear on it. Once I figured this out everything else went smoothly. As to the other coding aspects, I found it simple as I had the audio-visual video.
End Results of the Game
Click the screen to then start playing with WASD
DDS: How to become a game designer?
self note:
finish when you have headphones
Game Project - Idea Generation and Planning
In this lesson, we had to develop the technical knowledge for designing 2D game visuals and consider the opportunities for visual development on our team project.
Visual Development - Photographic Sprites
Back in 1992, the original Mortal Kombat game used photographic sprites for all its characters. This meant that the developers used to dress people up as the characters they designed, to then film them performing the actions in still frames were then they took the footage and used it as the animation game.
Mindmap
In this lesson the team and I created a mindmap to help visualise our collective ideas. We all agreed on being 8-bit and having the aesthetics of dark and dreamy. Also, we discussed the characters in the game and how they can relate to Stanmore College. So finally we decided that the bosses would be created in inspiration of teachers in our media department.
.jpg)
We then assigned every member something to do throughout the project. The objectives we made for the first week were to finish the concept art and the level design for each level. We made a schedule so we could be up to date each step of the way. I feel as if we would need to work at a fast pace to be able to create the prototype on time before creating the actual game.
fish
Mood Board

Our group decided to create a platform game that has the aesthetic of an 8-bit game. We also wanted the game to be set in the forest, and the colours to dull and gloomy. The narrative of the game is a boy lost in the forest. who is trying to get his way back home. In order to get out of the forest he must defeat the forest beasts. Each character in our game is inspired by either a student or a teacher in the college.
Concept Art for Each Character
.jpg)
.jpg)
.jpg)
.jpg)
.GIF)
Level Design
Level 1
I made the level design for level 1 of the prototype game while I asked the other team members for their opinions on the design and asked for their ideas so that I could add them to the design.
Using the techniques I used from the level design workshop I was able to complete the level design for the game much more easily. I used the same type of paper (grid paper) to make the design as this layout is similar to the one on construct 3 when making the prototype and actual game. I used sketches and labels instead of making detailed drawings as this is just the design for the layout and not the theme or the game.

.jpeg)
As a group, we all decided to keep level one as simple as possible so that it could help the player become familiar with the game and for the game to gradually become harder.
Level 2
.jpg)
Level 3
.jpg)
Level 4
.jpg)
Level 5
.jpg)
Levels 2,3,4 and 5 are supposed to all be similar to each other. The player should fight their way to the other side of the level to enter the next one.
Ending Screen
.jpg)
Prototype

While making the prototype I made some changes to the design but most of the structure to the game I kept the same.

I made the exit levels with following a certain level design but I followed the same design for the rest of the levels but added in coins for the player to collect instead of just killing the boss.

Team Schedule
Poster Design
We all discussed how we wanted the poster to look where we wanted to place the title and which characters we wanted to include. We wanted our poster to look similar to the Undertale poster.

Rundgren, G. (2016) 'Undertale Poster,' Pinterest.
https://uk.pinterest.com/pin/375346950174493022/.
https://uk.pinterest.com/pin/375346950174493022/.
.jpg)
Reflective Journal - 6th January
In this lesson we had a team meeting and we discussed on the progress so far and made a new team schedule according to the parts we missed out on to be completed before the end of this year.
As I was creating the prototype I thought the coding would be the hardest as I was concerned about finishing it on time. Dovydas also thought that coding would be the hardest. Leo was concerned about the audio aspect in the game.
Reflective Journal - 13h January
In this lesson, we went around in our groups and played other team's games and gave criticism to them by answering specific questions. One of each team member stayed back and wrote the crit that was given to the game.
.jpg)
.jpg)
.jpg)
.jpg)
In our group, we made the other test out both our prototype and game. So we wrote down all the feedback we got. The feedback we got was all very similar. From this session, we understood that we had to make the instructions of the game more clear to the player.
Reflective Journal - 20h January
In this lesson, we discussed our marketing poster and how we wanted it to look like. Viktor creates a simple sketch of how we wanted the poster to look like.
In the same lesson, I started creating the poster on Adobe Photoshop, as I couldn't find the exact font that we used in the game for the title I found the closest font that looked like it.

The above image is the progress of the poster so far, we are planning to add the other characters as soon as they have been animated.
Final Team Crits - 27th January
Today each group went around the class to give a final critique of everyone's games. This time I stayed back and wrote down all the feedback we got for the game. Most of the feedback we got. We already knew that we had to change. .
.jpg)
.jpg)
One of the feedbacks we got from Harris was that the character was sliding across the game and there was no walking movement. So we used this crit to change the game
Final Game
This is our team's final game, published on itch.io So you are able to play and have a look.
Click on the screen to start playing.
No comments:
Post a Comment